Easy Homemade Bread

Easy Homemade Bread

There’s an unparalleled satisfaction in baking your own bread – the aroma wafting through your kitchen, the warmth of the oven, and the joy of slicing into a freshly baked loaf. For those ready to embark on the journey of homemade bread, this comprehensive guide will equip you with the knowledge and techniques needed to master the art of bread making.

Understanding Ingredients and Equipment: Before diving into the process, it’s essential to understand the key ingredients and equipment. Quality flour, such as all-purpose or bread flour, forms the foundation of your bread. Active dry yeast serves as the leavening agent, while sugar and salt enhance flavor and texture. Basic kitchen tools like mixing bowls, measuring cups, and a sturdy mixing spoon are indispensable. A bread pan or baking sheet ensures proper shaping and baking of your loaves.

Preparing the Dough: The journey begins by activating the yeast, a crucial step that involves proofing it in warm water until it becomes frothy. This indicates its readiness to leaven the dough. Mixing the flour, sugar, salt, and activated yeast forms the initial dough. Kneading, a labor of love, develops the gluten strands, providing structure and elasticity to the bread. The dough’s consistency should be supple, smooth, and slightly tacky, a result achieved through attentive kneading.

The Art of Rising and Shaping: Allowing the dough to rise is where patience meets anticipation. Covering the dough and placing it in a warm, draft-free environment encourages fermentation, enabling the yeast to produce carbon dioxide and leaven the bread. After the first rise, gently deflate the dough and shape it according to your preference – whether it’s a traditional loaf, rustic round, or artisanal shape. Proper shaping not only enhances aesthetics but also influences the bread’s texture and crumb structure.

Baking to Perfection: Preheating the oven is crucial for even baking and optimal rise. As the bread bakes, the kitchen fills with an irresistible aroma, heightening anticipation. The golden-brown crust signifies the bread’s readiness, while the hollow sound upon tapping its base confirms its baked perfection. Cool the bread on a wire rack to prevent the bottom from becoming soggy and to promote even cooling.

Savoring the Fruits of Your Labor: Finally, the moment arrives to savor the fruits of your labor. Slice into the freshly baked loaf, reveling in its soft crumb and crusty exterior. Whether enjoyed warm with a slather of butter or used to elevate sandwiches and toast, homemade bread offers incomparable flavor and satisfaction. Share the joy with loved ones, and let the aroma of freshly baked bread fill your home time and time again.

Conclusion: Embarking on the journey of homemade bread is a rewarding endeavor that transcends mere sustenance. It’s a testament to craftsmanship, patience, and the simple pleasures of life. Armed with knowledge, patience, and a dash of creativity, anyone can master the art of bread making and transform humble ingredients into culinary delights. So roll up your sleeves, preheat your oven, and embark on a journey that promises not only delicious bread but also a deeper connection to the timeless tradition of baking.

Easy Homemade Bread

Ingredients:

  • 3 cups all-purpose flour
  • 1 tablespoon sugar
  • 1 teaspoon salt
  • 1 packet (2 1/4 teaspoons) active dry yeast
  • 1 cup warm water (about 110°F or 45°C)
  • 2 tablespoons olive oil or melted butter

Instructions:

  1. In a large mixing bowl, combine the warm water and sugar. Sprinkle the yeast over the water and let it sit for about 5-10 minutes until it becomes foamy.
  2. Once the yeast is activated, add the salt and olive oil (or melted butter) to the yeast mixture and stir to combine.
  3. Gradually add the flour, one cup at a time, stirring well after each addition. Once the dough becomes too stiff to stir, turn it out onto a lightly floured surface.
  4. Knead the dough for about 5-10 minutes until it becomes smooth and elastic. If the dough is too sticky, you can add a little more flour, a tablespoon at a time, until it reaches the right consistency.
  5. Place the dough in a lightly greased bowl, cover it with a clean kitchen towel or plastic wrap, and let it rise in a warm, draft-free place for about 1-2 hours or until it has doubled in size.
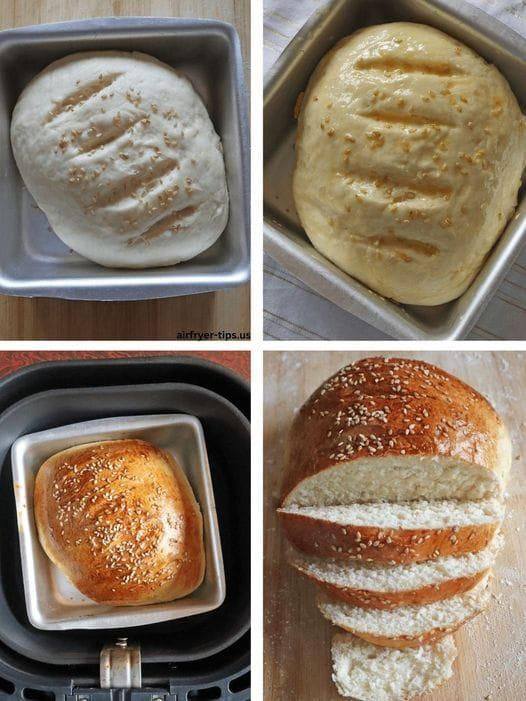
  6. Once the dough has risen, punch it down to release the air bubbles. Shape it into a loaf and place it in a greased loaf pan. Alternatively, you can shape it into a round or oval and place it on a greased baking sheet.
  7. Cover the dough again and let it rise for another 30-60 minutes until it has doubled in size.
  8. Preheat your oven to 375°F (190°C). Once the dough has risen, bake it in the preheated oven for 25-30 minutes or until the top is golden brown and the loaf sounds hollow when tapped on the bottom.
  9. Remove the bread from the oven and let it cool in the pan for a few minutes before transferring it to a wire rack to cool completely.
  10. Slice and enjoy your freshly baked homemade bread! You can store any leftovers in an airtight container or resealable bag at room temperature for up to 3-4 days, or freeze for longer storage.