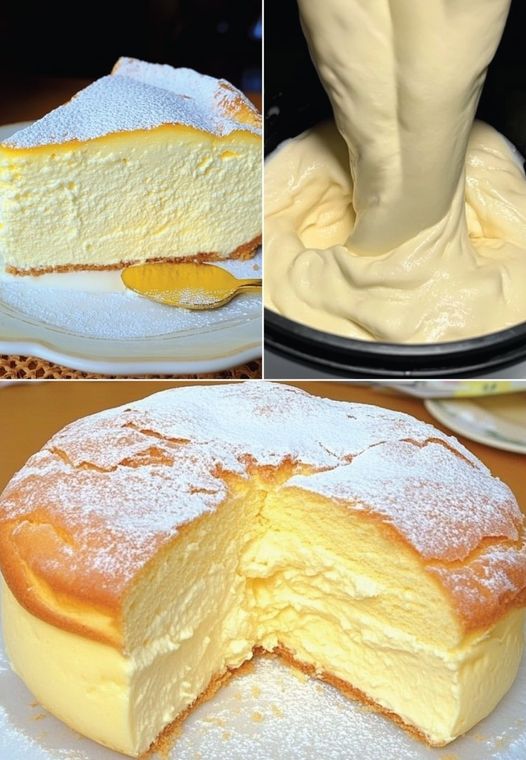
Light and Airy Cloud Cake: A Weight Watchers-Friendly Recipe
Cloud cake is a delightful, airy dessert that captures the essence of lightness and sweetness. This recipe transforms the traditional cloud cake into a healthier version that fits seamlessly into your Weight Watchers journey. With its fluffy texture and subtle flavors, this cake makes for an indulgent treat without the guilt.
Why Choose Cloud Cake?
Cloud cake is known for its light texture, making it a perfect option for those who crave a sweet treat without the heaviness of traditional cakes. Its unique preparation method results in a cake that is both satisfying and low in points, allowing you to enjoy dessert while adhering to your health goals.
Recipe Overview
Ingredients
For the Cloud Cake:
6 large egg whites
1 cup granulated sugar substitute (such as Stevia or Splenda) (200g)
1 teaspoon vanilla extract
1/2 teaspoon almond extract
1/4 teaspoon salt
1/2 teaspoon cream of tartar
1 cup all-purpose flour (120g)
1/2 cup unsweetened almond milk (120ml)
For the Optional Topping:
1 cup light whipped topping (like Cool Whip, thawed)
Fresh berries (strawberries, blueberries, raspberries) for garnish
Nutritional Information (Per Serving)
Serving Size: 1 slice (1/12 of the cake)
Calories: 90
Protein: 3g
Carbohydrates: 16g
Fat: 1g
Fiber: 0g
SmartPoints: 2
Weight Watchers Points
Cloud Cake: 2 SmartPoints per slice
Optional Topping (2 tablespoons): 1 SmartPoint
Total for Cake with Topping: 3 SmartPoints
Instructions
Step 1: Prepare Your Baking Pan
Preheat the Oven: Preheat your oven to 325°F (160°C). This ensures that the cake bakes evenly.
Prepare the Pan: Use a non-stick 9-inch round cake pan or a tube pan. Do not grease the pan, as the cake needs to cling to the sides to rise properly.
Step 2: Whip the Egg Whites
Separate the Eggs: Carefully separate the egg whites from the yolks, ensuring no yolk gets into the whites. This step is crucial for achieving the desired fluffiness.
Beat the Egg Whites: In a large mixing bowl, use an electric mixer to beat the egg whites on medium speed until they become frothy, about 1-2 minutes.
Add Cream of Tartar: Sprinkle in the cream of tartar, which stabilizes the egg whites, and continue beating until soft peaks form, about 2-3 more minutes.
Step 3: Incorporate Sweetener and Flavors
Gradually Add Sweetener: Slowly add the granulated sugar substitute, one tablespoon at a time, while continuing to beat the egg whites. This process helps to create a glossy meringue.

Add Extracts: Once the mixture is glossy and stiff peaks form, gently fold in the vanilla and almond extracts. Be careful not to deflate the egg whites.
Step 4: Combine Dry Ingredients
Mix Dry Ingredients: In a separate bowl, sift together the all-purpose flour and salt. Sifting helps remove lumps and aerates the flour.
Combine Wet Ingredients: In another bowl, mix the unsweetened almond milk with the dry ingredients until just combined. This will create a light batter.
Step 5: Combine Mixtures
Fold Mixtures Together: Gently fold the dry mixture into the beaten egg whites. Use a rubber spatula and be careful to maintain the volume of the egg whites. This step is key to keeping the cake light.
Transfer to Pan: Once combined, pour the batter into the prepared cake pan. Use a spatula to smooth the top evenly.
Step 6: Bake the Cake
Bake in Oven: Place the pan in the preheated oven and bake for 25-30 minutes, or until the cake is golden brown and a toothpick inserted into the center comes out clean.
Cool the Cake: Once baked, remove the cake from the oven and let it cool in the pan for about 10 minutes. Then, run a knife around the edges to loosen the cake and invert it onto a wire rack to cool completely.
Step 7: Prepare the Optional Topping
Whipped Topping: If desired, prepare the light whipped topping by folding the thawed whipped topping into a bowl. This will add a creamy texture that complements the cake perfectly.
Add Fresh Berries: Rinse and prepare your fresh berries. Strawberries can be sliced, while blueberries and raspberries can be used whole.
Step 8: Serve Your Cloud Cake
Slice and Plate: Once the cake is completely cooled, slice it into 12 equal portions.
Top with Whipped Topping: Serve each slice topped with 2 tablespoons of the light whipped topping and a generous portion of fresh berries.
Presentation: Arrange the slices on a serving platter, garnished with extra berries for a visually appealing presentation.
Step 9: Enjoy Responsibly
Savor Every Bite: Enjoy your light and airy cloud cake, knowing that it aligns with your Weight Watchers goals. The fluffy texture and sweetness will satisfy your dessert cravings without the excess points.
Store Leftovers: If you have any leftovers, store them in an airtight container in the refrigerator for up to three days. The cake is best enjoyed fresh but will still be tasty after chilling.
Additional Tips and Insights
Customization: Feel free to add lemon zest or a hint of cocoa powder to the batter for a different flavor profile. Just be mindful of the additional points if using chocolate.
Serving Suggestions: This cake pairs well with a cup of herbal tea or coffee, making it an excellent choice for brunch or afternoon tea.
Health Benefits: The use of egg whites provides protein while keeping the fat content low. Almond milk serves as a great dairy-free alternative, reducing calories further.
Perfect for Celebrations: This cloud cake is a great option for birthdays or gatherings, offering a light dessert that everyone can enjoy without compromising their dietary goals.
Conclusion
This Weight Watchers-friendly cloud cake is not only a delicious treat but also a smart choice for anyone looking to enjoy dessert without the guilt. With its airy texture and simple ingredients, you can indulge in a slice of this cake while staying on track with your health goals.


